Hey Nintendo fans! Guess what? I recently made the ultimate gaming pilgrimage to the iconic Nintendo New York store. Trust me, it’s a gaming paradise right in the heart of the concrete jungle! Let me take you on a virtual tour of this gamer’s wonderland.
As soon as I stepped inside the store, I was greeted by vibrant colors, cheerful music, and an atmosphere buzzing with excitement. It felt like I had entered the Mushroom Kingdom itself! The walls were adorned with larger-than-life characters, and the air was filled with a sense of nostalgia and anticipation.
First things first, I made a beeline for the merchandise section. Oh boy, was I in for a treat! From t-shirts featuring our beloved plumber Mario to adorable plushies of Yoshi and Pikachu, the store had a treasure trove of goodies for every Nintendo fan. I was very tempted to splurge on a Mario-themed cap, a Legend of Zelda keychain, and a Super Smash Bros. poster to decorate my gaming corner at home.
Next up, I had to check out the game section. It was a gamer’s dream come true! Rows and rows of Nintendo Switch games neatly lined the shelves, offering an extensive collection for every taste. From must-have classics like The Legend of Zelda: Breath of the Wild and Super Mario Odyssey to the latest releases like Animal Crossing: New Horizons and Splatoon 3, the store had it all. The sheer variety of titles made it challenging for me to decide which ones to add to my collection!
As I ventured further into the store, I discovered a dedicated area for Nintendo hardware. Nintendo Switch consoles, the OLED, classic and the Lite versions, stood proudly, ready to be taken home by eager gamers. The store had an extensive range of accessories as well, from colorful Joy-Con controllers to protective cases and screen protectors. It was a one-stop shop for all your Nintendo gaming needs!
But wait, there’s more! The second floor of the store housed an impressive showcase of Nintendo memorabilia and history. It was like stepping into a time capsule that chronicled the journey of this iconic gaming company. From vintage Game Boy consoles and the legendary Super Nintendo Entertainment System (SNES) to the revolutionary Wii and beyond, I felt a rush of nostalgia as I relived the milestones of Nintendo’s gaming legacy.
One of the highlights of the second floor was the fact that more than half the floor was taken over by the launch of The Legend of Zelda: Tears of the Kingdom. Just past the museum display was the gaming area, and a gigantic display dedicated to the new Zelda arrival. There was a life-size Link in all his glory, in front of the Tears of the Kingdom logo. Dude!
After exploring every nook and cranny of the store, I walked over to the interactive gaming lounge, also on the second floor. Equipped with large screens and comfy seating, this space allowed gamers to indulge in multiplayer battles and engage in friendly competitions. I joined a group of fellow gamers and spent a memorable afternoon battling it out in Mario Kart and Super Smash Bros. It was a fantastic opportunity to connect with other gamers and share our love for all things Nintendo.
As headed back to the first floor, reflecting on my adventure at Nintendo New York, I couldn’t help but appreciate the overall experience the store offered. It wasn’t just a place to buy games and merchandise—it was a celebration of gaming culture and the impact Nintendo has had on generations of gamers.
What sets Nintendo New York apart is the immersive atmosphere and attention to detail. The store staff members, dressed in Nintendo-themed attire, were friendly and enthusiastic, ready to answer any questions and share their love for gaming. They truly made every visitor feel welcome and embraced the spirit of gaming community.
Nintendo New York also hosted special events and tournaments, making it a hub of activity and excitement for gamers. Whether it was a Super Smash Bros. tournament or a Pokémon trading card event, the store provided opportunities for fans to connect, compete, and have a blast together. It’s a testament to Nintendo’s commitment to fostering a sense of camaraderie and shared experiences among gamers.
Before I knew it, the time had come to say goodbye to Nintendo New York. So I headed down the stairs, saying goodbye to Mario who was sliding down the flag pole. But the memories and the magic of this gaming wonderland will stay with me forever. The store is a must-visit for any gaming enthusiast, whether you’re a die-hard Nintendo fan or simply appreciate the joy and creativity that gaming brings. Oh, and that’s when I noticed it. There was another gigantic display that I completely missed on my way into the store. Encased in plexiglass was the…sorry…not going to spoil it. If you want to know, you’ll have to visit the store.
So, if you find yourself in the heart of New York City, make sure to carve out some time to visit Nintendo New York. Lose yourself in the nostalgia, immerse yourself in the world of gaming, and revel in the excitement that this store has to offer. Trust me, you won’t be disappointed. Until then, keep gaming and stay geeky, my friends!
Disclaimer: This article is purely based on my personal experiences and observations. The availability of products and features may vary over time. It is always recommended to check the official Nintendo New York store website or contact them directly for the most up-to-date information.
In the vast landscape of gaming history, few names resonate as powerfully as Tetris—the puzzle game that captured the hearts of millions around the world. Now, Tetris Effect, the brainchild of visionary game designer Tetsuya Mizuguchi, brings this iconic classic back to where it all began—Nintendo, the home of gaming innovation. Developed by Monstars Inc. and Resonair, Tetris Effect is more than just a game; it’s a transcendent audio-visual experience that pays homage to the original while pushing the boundaries of gameplay. In this article, we’ll explore the rich history of Tetris, delve into Tetsuya Mizuguchi’s influence on the game, and celebrate the long-awaited reunion of Tetris and Nintendo on the Nintendo Switch.
Here’s the official launch trailer:
The Birth of a Legend: The Origins of Tetris
To truly appreciate the significance of Tetris Effect’s reunion with Nintendo, we must rewind the clock to the early 1980s. Tetris was the brainchild of Russian computer engineer Alexey Pajitnov, who developed the game in 1984. It quickly gained popularity, captivating players with its simple yet addictive gameplay. The release of Tetris on the original Game Boy in 1989 further solidified its place in gaming history, becoming an instant hit and forever linking Tetris with the Nintendo brand.
If you’re interested in the history of Tetris, be sure to check out the AppleTV+ original movie Tetris starring Taron Egerton. Based on the true story of American video game salesman Henk Rogers (Egerton) and his discovery of Tetris in 1988. When he sets out to bring the game to the world, he enters a dangerous web of lies and corruption behind the Iron Curtain.
Ars Technica also has a great short video featuring Alexey Pajitnov and Henk Rogers, where they share some history, game strategies, and trivia on Tetris. . It’s a fun watch for sure.
Tetsuya Mizuguchi: A Game Design Visionary
Enter Tetsuya Mizuguchi, a name synonymous with innovative game design and transformative experiences. Mizuguchi’s career has been defined by his ability to fuse gameplay with sensory immersion, creating games that transcend the boundaries of traditional entertainment. Renowned for his work on titles like “Rez” and “Lumines,” Mizuguchi’s creative genius is unparalleled. Intrigued by the concept of synesthesia—the blending of senses—he recognized the potential to elevate Tetris to new heights by immersing players in a multi-sensory journey.
Tetris Effect: The Evolution of a Classic
Tetris Effect stands as a testament to Mizuguchi’s visionary approach to game design. By infusing Tetris with his signature style, he redefines the very essence of the game. Tetris Effect is not merely a puzzle game; it’s a mind-altering experience that transcends traditional gameplay boundaries. The audio-visual symphony that unfolds as players rotate and stack Tetriminos is mesmerizing, drawing players into a world where sound and visuals dance in harmony with their every move. From underwater realms to breathtaking cityscapes, each stage is a testament to Mizuguchi’s commitment to delivering an unforgettable journey through sensory immersion.
Nintendo Switch OLED: The Perfect Homecoming
As Tetris Effect makes its triumphant return on the Nintendo Switch, the game embarks on a full-circle journey, reuniting with the platform that played a pivotal role in its early success. The portable nature of the Nintendo Switch beautifully echoes the spirit of the original Game Boy, offering players the freedom to indulge in the captivating world of Tetris Effect anytime, anywhere. Whether you opt for the convenience of handheld mode or seek a more immersive experience by docking the Switch to your TV, Tetris Effect on the Switch proves to be an exquisite pairing that seamlessly blends nostalgic charm with contemporary innovation. It serves as a testament to the rich history of Tetris while embracing the versatility and adaptability that the Switch platform has to offer.
The Nintendo Switch, with its vibrant display and adaptable design, provides an ideal canvas for the immersive experience that Tetris Effect brings to the table. Regardless of your gaming preferences, whether you find solace curled up on a couch or prefer the company of friends gathered around the TV, the Switch effortlessly accommodates your desired gaming style. The console’s portable nature ensures that you can carry the enchantment of Tetris Effect wherever you go, inviting others to partake in its captivating beauty and share in the joy of puzzle-solving. By blending nostalgia with innovation, Tetris Effect’s reunion with Nintendo on the Switch exemplifies a harmonious fusion of past and present, paying homage to the game’s origins while embracing the transformative creative vision of Mizuguchi. This fusion creates an extraordinary and magical experience that resonates with players of all generations, inviting them to delve into a multi-sensory adventure that stretches the boundaries of perception and leaves them yearning for more.
The game is now sold as Tetris Effect: Connected. The Connected edition allows you to challenge your friends locally or online. Here’s the the quick recap from Nintendo for more:
PlayStation VR
I recently came across an awesome video on the Nick Robinson YouTube channel featuring Tetris pro Trey Harrison trying out Tetris Effect for the first time. What’s even more impressive is that he played it using a PSVR headset, and his skills actually improved compared to the standard PlayStation version. It’s incredible to see how the combination of immersive visuals and virtual reality elevated his gameplay to a whole new level. Trey’s positive reception speaks volumes about the game’s quality, and I highly recommend checking out the video to witness his mastery in action.
But Which Platform?
The first platform I played Tetris Effect on was the PS5. The sound and graphics are absolutely astounding. If you a PlayStation Plus Extra subscription or above, the game is included for free in the Game Catalog. For all others it retails for US $39.99.
However, when I’m away from my gaming setup at home, I prefer the Nintendo Switch OLED, which I picked up recently. But a word to the wise…If you are a Nintendo Online subscriber, you may be tempted to pick up a digital copy of the game. Before you do, I suggest you read my recommendation at the end of this article.
Final Thoughts
In the vast realm of gaming, few titles hold the same cultural significance as Tetris. With Tetris Effect’s arrival on the Nintendo Switch, we witness a remarkable reunion—a convergence of gaming legends. This iteration breathes new life into the beloved classic, enveloping players in a sensory symphony that pushes the boundaries of gameplay. The Nintendo Switch, with its portable design and vibrant screen, serves as the perfect platform for this reunion, allowing players to embark on a mesmerizing journey wherever they go. Tetris Effect on the Nintendo Switch is a triumph—a testament to the enduring magic of Tetris and a celebration of the visionary minds that continue to shape the world of gaming. So, stack those Tetriminos, lose yourself in the audio-visual splendor, and experience the harmonious reunion of Tetris and Nintendo on the Nintendo Switch. Get ready to be transported to a world where blocks become art and gaming becomes an ethereal adventure.
UPDATE: Digital vs. Physical: The Battle Rages On
In general, I’m not a big fan of digital versions of Nintendo Switch games as they are hard to share with family members and friends, and forget trying to sell them later on. Before I go off on a rant, let me say that the exception is when the Nintendo Online Store offers deep discounts like games for $10 and under. This is not one of those instances, so I recommend opting to buy a physical copy instead.
The physical cartridge is near impossible to find at a reasonable price on most retail sites, and eBay prices can be north of $89 for a brand new sealed game. I recommend heading over to Limited Run Games to buy a cartridge in a case. They have a good selection of games on cartridge that are hard to find as physical media elsewhere. Most importantly, this is where you can find the cartridge version of Tetris Effect for Nintendo Switch at a reasonable price. At the writing of this article, the price was US $39.99 plus shipping. This is also one of those games for collectors, so feel free to add on the protective case for an additional $1.99.
Depth of field is the range of distance in a photograph that appears sharp and in focus. Bokeh, on the other hand, refers to the quality and aesthetic of the blurred out-of-focus areas in a photograph. Both depth of field and bokeh are important elements in photography and can be used creatively to enhance the visual impact of an image.
Depth of Field
Depth of field is controlled by three factors: aperture, distance to subject, and focal length. Aperture is the opening in the lens through which light passes to reach the camera’s sensor. The wider the aperture, the shallower the depth of field will be. This means that the subject in focus will be sharp, while the background and foreground will be blurred. This effect is commonly used in portrait photography to isolate the subject and create a pleasing, creamy background blur.
Distance to subject also affects depth of field. The closer the subject is to the camera, the shallower the depth of field will be. This is why macro photography, which involves getting very close to the subject, typically has very shallow depth of field. Focal length, or the distance between the lens and the sensor, also plays a role. Longer focal lengths, such as 85mm or 100mm, will have shallower depth of field than shorter focal lengths, such as 24mm or 35mm.
Bokeh
Bokeh refers to the aesthetic quality of the blurred out-of-focus areas in a photograph. The quality of bokeh is determined by the shape and size of the aperture in the lens. A lens with a circular aperture will produce round, pleasing bokeh, while a lens with a more angular aperture will produce harsher, less attractive bokeh.
Bokeh can also be affected by the distance between the subject and the background. If the background is very far away from the subject, it will appear more blurred and create a smoother, creamier bokeh effect. If the background is closer to the subject, it may appear more defined and produce a more distracting, less attractive bokeh effect.
Using Bokeh in Photography
Bokeh can be used creatively in a variety of different photography genres. Portrait photography is perhaps the most common, as the shallow depth of field and pleasing bokeh effect can help to isolate the subject and create a more visually appealing image. Landscape photographers may also use bokeh to create a sense of depth and dimension in their images, by intentionally blurring elements in the foreground or background.
In street photography, bokeh can be used to create a sense of motion and activity in an image. By intentionally blurring people or objects in motion, the photographer can create a sense of energy and movement in an otherwise static image. In product photography, bokeh can be used to draw attention to a specific element or detail in the product, by intentionally blurring out the surrounding areas.
Using Bokeh in Video
While bokeh is typically associated with still photography, it can also be used creatively in video. Vloggers, in particular, may find bokeh useful in creating a more visually appealing and engaging video. By using a lens with a wide aperture, vloggers can create a shallow depth of field and pleasing bokeh effect, which can help to isolate the subject and create a more professional-looking video.
Best Cameras for Bokeh
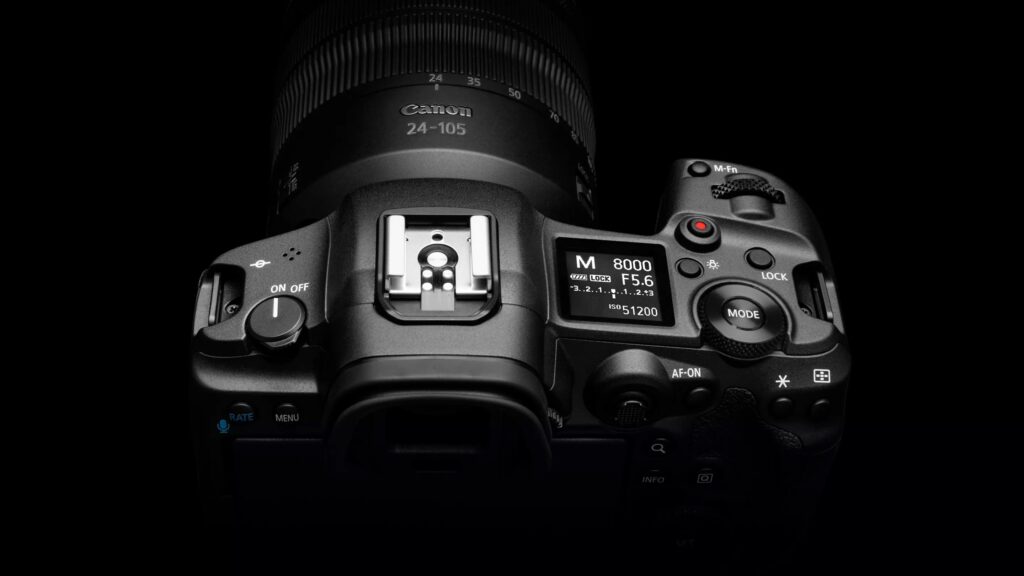
Images courtesy Canon USA, Inc.
Canon and Sony both offer excellent digital cameras for capturing bokeh. The Canon EOS R5 is a mirrorless camera that boasts a full-frame sensor, allowing for excellent image quality and low light performance. Its RF mount lenses also offer excellent bokeh, particularly the RF 50mm f/1.2L USM lens.
The Sony a7 III is a popular choice for both stills and video, with a full-frame sensor and excellent autofocus capabilities. Additionally, Sony offers a variety of lenses with excellent bokeh, including the Sony FE 85mm f/1.4 GM lens and the Sony FE 135mm f/1.8 GM lens.
Photos courtesy Sony Corporation
For vloggers, mirrorless cameras are a popular choice due to their compact size and excellent video capabilities. The Sony ZV-1 is a popular choice for vloggers, with a fast aperture and built-in ND filter for creating shallow depth of field and pleasing bokeh. The Canon EOS M50 Mark II is another excellent choice for vloggers, with a flip-out screen and fast autofocus for easy vlogging on the go.
Using Bokeh on iPhone
Photos courtesy Apple Inc.
While the built-in camera on the iPhone may not have as much control over depth of field and bokeh as a dedicated camera, there are still ways to create a pleasing bokeh effect. The iPhone’s Portrait mode uses software to create a shallow depth of field and pleasing bokeh effect, particularly on newer models with multiple cameras. Additionally, third-party lens attachments such as Moment lenses can be used to create a more professional-looking bokeh effect on iPhone photos and videos.
In conclusion, understanding how depth of field and bokeh work can help photographers and videographers create more visually appealing and professional-looking images and videos. By using a combination of aperture, distance to subject, and focal length, along with considerations such as the shape and size of the aperture, photographers can create stunning images with pleasing bokeh effects. And with the wide range of cameras and lenses available today, there are options for photographers and vloggers of all skill levels and budgets to experiment with bokeh in their work.
More on Bokeh
Bokeh is that beautiful, out-of-focus blur that you see in the background of a lot of great photos. It’s like the icing on the cake, the cherry on top, the sprinkle on the cupcake…you get the idea. But how does it work?
Well, it all comes down to depth of field. Basically, depth of field is the range of distance in your photo that is in focus. And by adjusting your camera settings, you can control how much of your photo is in focus and how much is blurry bokeh goodness.
The first thing you’ll want to play around with is aperture. The wider the aperture (i.e. the lower the f-stop number), the shallower your depth of field will be. So if you want some beautiful bokeh, you’ll want to use a wide aperture. Simple, right?
But it’s not just about the aperture. The distance between your camera and your subject also plays a role in the depth of field. The closer you are to your subject, the shallower your depth of field will be. And of course, the opposite is true too – the further away you are from your subject, the deeper your depth of field will be.
Finally, focal length also plays a role in depth of field. The longer the focal length, the shallower your depth of field will be. So if you want some really intense bokeh, you’ll want to use a longer focal length.
Now, let’s talk about cameras. If you’re shooting with a Canon digital camera, you’ve got some great options for creating beautiful bokeh. The Canon EF 85mm f/1.2L II USM lens is a favorite among portrait photographers for its ability to create some truly stunning bokeh. And the Canon EOS R5 mirrorless camera is also a great choice for creating bokeh, with its fast autofocus and high-quality lenses.
If you’re shooting with a Canon digital camera, you’ll want to use a lens with a wide aperture, such as the Canon EF 50mm f/1.8 STM lens or the Canon EF 85mm f/1.8 USM lens. Set your camera to aperture priority mode and choose a low f-stop number, such as f/1.8 or f/2.8. This will create a shallow depth of field and beautiful bokeh. If you’re shooting in low light conditions, you may need to increase your ISO to get a properly exposed shot.
But if you’re more of a Sony fan, don’t worry – you’ve got options too. The Sony FE 85mm f/1.4 GM lens is a fantastic choice for creating beautiful bokeh, as is the Sony FE 135mm f/1.8 GM lens. And for vloggers, the Sony ZV-1 is a popular choice with its built-in ND filter and fast aperture.
For Sony cameras, the Sony FE 85mm f/1.4 GM lens or the Sony FE 50mm f/1.8 lens are great options for creating bokeh. Set your camera to aperture priority mode and choose a low f-stop number, such as f/1.4 or f/2.8. If you’re shooting in low light, you can also increase your ISO or use the camera’s built-in noise reduction features.
And what about iPhone users? While the iPhone doesn’t have as much control over depth of field and bokeh as a dedicated camera, you can still create some great effects with the built-in Portrait mode. And if you want to take things to the next level, you can try out third-party lens attachments like Moment lenses for even more control over your bokeh.
For iPhone users, the built-in Portrait mode is the easiest way to create a shallow depth of field and beautiful bokeh. Simply open the camera app, select Portrait mode, and snap your shot. For even more control over your bokeh, you can try out third-party lens attachments such as Moment lenses. And don’t forget to play around with your distance to the subject and background to create different bokeh effects.
Lighting Conditions and Bokeh
When it comes to lighting conditions, the best bokeh effects are often achieved in low light or indoor situations, where the background is darker and the subject is illuminated. But that doesn’t mean you can’t create beautiful bokeh outdoors in daylight! In fact, shooting in bright daylight can create some really interesting effects, with the bokeh appearing as bright, colorful circles in the background.
To achieve bokeh in bright daylight, you’ll want to use a fast shutter speed and low ISO to avoid overexposure. Use a low f-stop number, such as f/1.8 or f/2.8, and position your subject so that the background is further away. This will create a shallow depth of field and beautiful bokeh, even in bright daylight.
In low light conditions, you may need to use a higher ISO or a slower shutter speed to properly expose your shot. Be aware that using a higher ISO can increase the amount of noise in your photo, so you may want to use noise reduction features in post-processing to clean up your image.
To Bokeh, or Not to Bokeh?
Bokeh is best used when you want to create a visual separation between your subject and the background, drawing the viewer’s attention to the subject and creating a sense of depth in your image.
This effect is often used in portrait photography, where a shallow depth of field and beautiful bokeh can make your subject stand out and give your photo a professional look. Bokeh can also be used in macro photography, where you want to isolate a small subject against a blurry background, or in landscape photography, where it can add a dreamy, romantic feel to your shot.
Another great use for bokeh is in vlogging, where it can create a cinematic look and add visual interest to your videos. By using a wide aperture and a shallow depth of field, you can create a blurred background that adds depth and dimension to your shots, making your vlog look more polished and professional.
It’s worth noting that while bokeh can be a beautiful effect, it’s not always necessary or appropriate for every shot. Sometimes you may want to capture more of the scene in focus, or the background may be an important part of the story you’re trying to tell. In those cases, a larger depth of field and less bokeh may be the way to go.
Ultimately, the decision to use bokeh or not should be based on your creative vision and the story you want to tell with your photo or video. But when used effectively, bokeh can be a powerful tool for creating stunning, visually captivating images.
Are you a scrapbooking enthusiast? Do you love adding a personal touch to your projects? Well, have you considered using seamless patterns?
Seamless patterns are a creative design element that can add interest and texture to your scrapbook pages. But, did you know that they can also be used for other creative endeavors like graphic design, web design, and even greeting card making?
In greeting card making, seamless patterns can be used as backgrounds or accents. This makes the card more visually appealing and adds a personal touch. They can even be used to create custom envelopes or wrapping paper, taking your creativity to the next level.
But, the versatility of seamless patterns doesn’t stop there! They’re perfect for businesses that specialize in stationery, like wedding invitations or event invitations. Customize them to match the theme or color scheme of your event, and create a cohesive look across all of your stationery.
Seamless patterns can also be used in graphic design and web design. They add interest and depth to designs and can even be used to create custom graphics or icons. With so many possibilities, the sky’s the limit!
One of the best things about seamless patterns is that they can be used across different mediums. This means that once you find a pattern that you love, you can use it on multiple projects. For example, you can use the same pattern on a scrapbook page and a greeting card, creating a cohesive look across all of your projects.
So, where can you find seamless patterns? Etsy is a great place to start. They offer a wide variety of high-quality patterns that can be downloaded as digital files. This means that you can start using them right away, and there’s no need to wait for shipping. Plus, with so many options, you’re sure to find a pattern that fits your style and needs.
In conclusion, seamless patterns are a versatile and creative design element that can add interest and texture to a variety of projects. They’re perfect for scrapbooking, greeting card making, graphic design, and web design. With the right pattern, you can create a cohesive look across all of your projects, making your creativity stand out. So, what are you waiting for? Start exploring the world of seamless patterns and take your creativity to the next level!
Capturing stunning images of waterfalls can be a challenging yet rewarding experience, especially for YouTubers who want to showcase their adventures to their followers. Waterfalls are dynamic, constantly changing in shape and form, and the water can be tricky to capture just right. However, with the right camera settings and a bit of know-how, you can create breathtaking footage of waterfalls for your YouTube channel.
Firstly, it’s important to have a camera that can shoot high-quality video footage. For YouTube purposes, you’ll want something that can shoot in at least 1080p or preferably 4K resolution, with good image stabilization and a fast autofocus system. Some of the top cameras for YouTube include the Canon EOS R6, Sony A7 III, and the Panasonic Lumix GH5.
When it comes to camera settings, the key to capturing great waterfall footage is to use a slower shutter speed. This creates a smooth, silky effect on the water, giving it a dreamy, serene appearance. To achieve this effect, start with a shutter speed of around 1/10th of a second and experiment from there. If the water appears too blurry, increase the shutter speed slightly, and if it looks too crisp, slow it down a bit.
To achieve a slower shutter speed, you’ll likely need to use a smaller aperture (higher f-number) or a neutral density (ND) filter. An ND filter acts as sunglasses for your lens, allowing you to use a slower shutter speed without overexposing the image. Start with an ND filter that’s around 3 stops or so and adjust from there based on lighting conditions.
Another important setting to consider is the ISO. For waterfalls, you’ll typically want to keep your ISO as low as possible to avoid introducing noise (graininess) into your image. Depending on the lighting conditions, you might be able to shoot at ISO 100 or 200, but you might need to bump it up a bit in lower light situations.
When it comes to focusing, manual focus is recommended, and it’s important to focus on the waterfall itself rather than the surrounding environment. This ensures that the waterfall is the main focus of the shot, with the rest of the scene falling into a nice, blurry background. If your camera has focus peaking, this can be a helpful tool to ensure your focus is accurate.
Finally, composition is essential when it comes to capturing great footage of waterfalls. It’s important to think about how you can make your shot stand out, especially since waterfalls are a popular subject for photography and videography. Experiment with different angles, such as shooting from the bottom of the waterfall looking up, or from the side to capture the flow of the water. You can also use the rule of thirds, placing the waterfall off-center to create a more dynamic composition.
In conclusion, capturing stunning footage of waterfalls requires the right camera settings, some creativity, and a bit of experimentation. With the right equipment and techniques, you can create breathtaking footage of waterfalls that will captivate your audience on YouTube. So go out there and explore, have fun, and create something beautiful for your viewers to enjoy.
As an avid camper, hiker, and outdoor enthusiast, I was excited to test out the Apple Watch Ultra, the latest addition to Apple’s smartwatch line-up. Although my Series 3 Apple Watch was good at tracking my workouts and logging my heart rate, it was no match for the Ultra’s new features.
Together with a team of gear testers, athletes, mountaineers, and adventurers, I spent three days in different environments, putting the Ultra’s new features to the test. The Apple Watch Ultra is built for the outdoors, and here’s why:
Battery Life: With up to 60 hours of battery life on Low Power Mode, the Apple Watch Ultra is ideal for multi-day adventures. This is a significant improvement over Apple’s previous watches, which needed to be charged every night.
GPS and Compass: The Ultra uses dual-frequency GPS for precise location tracking. The redesigned Compass includes Waypoints to mark places of interest, such as your car or tent. With Backtrack, you can drop digital breadcrumbs as you hike, allowing you to retrace your steps using your Ultra’s GPS.
Emergency Features: The Apple Watch Ultra includes several new emergency features that are incredibly useful for anyone adventuring in remote areas. Emergency SOS via satellite allows you to connect with emergency services using your iPhone 14 and communicate via text with an emergency responder. You can share your Medical ID, emergency contact information, and exact location.
The Ultra also has Fall Detection and Crash Detection, which are designed to detect severe falls and car crashes and trigger Emergency SOS if you don’t respond. The Emergency Siren is activated by holding down the Action button and sounds an 86-decibel siren to draw attention to your location. As a woman who frequently travels alone, this is an invaluable safety tool.
Design: The Apple Watch Ultra has a sleek 49-millimetre aerospace-grade titanium case that is corrosion-resistant and waterproof up to 100 metres. While the Ultra is a statement piece, I appreciate its larger size and smooth edges. Three active bands are available for alpine explorers, ocean adventurers, and endurance athletes, while the standard 45-millimetre bands are compatible with the Ultra for everyday wear.
Diving: For scuba divers, the Apple Watch Ultra is a game-changer. The new Oceanic+ app, designed with Huish Outdoors, transforms your watch into a dive computer with all the features you need for recreational diving to 40 metres. The Ultra tracked my depth, water temperature, dive time, and my full dive profile, and it even buzzed when I got close to my no-deco time or when it was time for a safety stop. The watch locks so you don’t have to fiddle with the touch screen while underwater, and the larger Digital Crown is handy and can easily be used with cold fingers.
In conclusion, the Apple Watch Ultra is an excellent tool for anyone who loves the outdoors. It offers a range of features that are specifically designed for adventuring, including improved battery life, GPS and compass, emergency features, and scuba diving capabilities. While it may be pricier than other smartwatches on the market, the Apple Watch Ultra is worth the investment for anyone who spends time exploring the great outdoors.
Let’s talk about one of the most important aspects of camping: picking the perfect spot to set up your tent. It’s all about location, location, location, and the terrain you’re camping on can make a huge difference in your overall experience. So, whether you’re a seasoned camper or a newbie to the game, let’s dive into some tips for picking the best campsite for your next adventure.
Grassy fields: When you’re setting up camp in a grassy field, it’s all about finding that perfect flat spot that’s free from any pesky rocks or sticks that could ruin your sleeping arrangements. You’ll also want to keep an eye out for any low-lying areas, because no one wants to wake up in a puddle of water after a rainy night. And let’s not forget, stakes are key to keep that tent from flying away in the wind, so make sure to secure it down.
Forests: If you’re the type of camper who loves the serenity of a forest, then you’ll want to find a spot with some flat ground and plenty of shade. But, be careful of any dead or diseased trees, because you don’t want one of those falling on your tent in the middle of the night. Plus, make sure to steer clear of any trees with heavy branches, because those bad boys can come down in a storm.
Mountainous terrain: Camping in the mountains can be an adventure in itself, but make sure to find a sheltered spot that’s protected from any strong winds. You don’t want your tent to fly away like Mary Poppins. Look for a flat surface and stay away from any edges of cliffs or steep drops. And don’t forget, make sure to properly stake your tent to the ground to keep it from blowing away.
Beaches: If you’re lucky enough to be camping on a beach, then you’re in for a treat. But, you’ll want to find a spot that’s high enough above the tide line to avoid getting flooded by the ocean. You also want to avoid setting up shop in a spot that’s too exposed to strong winds. And let’s face it, the sun can be a real killer, so aim for a spot with some shade. Oh, and don’t forget to bring those sturdy tent stakes and a mallet, because sand can be a little tricky to work with.
Deserts: Last but not least, camping in the desert can be a truly unique experience. Find a flat surface and some shade to avoid getting roasted by the hot desert sun. Plus, make sure to avoid setting up in any areas that are prone to flash floods. And, of course, don’t forget to properly stake your tent to the ground to avoid any wild wind adventures.
In summary, finding the perfect campsite is all about choosing the right terrain and following some simple tips. Whether you’re camping in a grassy field, a forest, a mountainous area, a beach, or the desert, always keep an eye out for flat ground, some shade, and protection from the elements. Now get out there and happy camping!
The PlayStation 5 has left a lasting impression on me. From its sleek design to its outstanding performance, the PS5 is definitely a console worth considering for gamers.
One of the biggest strengths of the PS5 is its powerful hardware. The console is equipped with a custom AMD Zen 2 processor, which delivers lightning-fast speeds and outstanding graphics. This means that gamers can enjoy their favorite games with stunning visual effects and minimal lag. Additionally, the PS5 is equipped with 16GB of RAM, which is more than enough to handle even the most demanding games.
Another major advantage of the PS5 is its exclusive games. The console features a range of exciting titles that can only be played on the PS5, including Spider-Man: Miles Morales, Demon’s Souls, and Returnal. These games take full advantage of the PS5’s hardware, offering an immersive and unforgettable gaming experience that cannot be replicated on any other console.
The PS5’s DualSense controller is also a major selling point. The controller features haptic feedback and adaptive triggers, which provide a more immersive gaming experience by simulating different sensations, such as the feeling of raindrops or the tension of a bowstring. The controller also has a built-in microphone, which makes it easy to communicate with other players while gaming.
The PS5’s user interface is intuitive and easy to navigate. The console has a dedicated home screen that displays your most recently played games and allows you to easily access your favorite apps and settings. The PS5 also has a built-in media player, which allows you to stream your favorite movies and TV shows in stunning 4K resolution.
In terms of performance, the PS5 outperforms its main competitor, the Xbox Series X, in several key areas. For example, the PS5 has a faster load time, thanks to its custom SSD storage. This means that games load faster and players can spend less time waiting and more time gaming. The PS5 also has better graphics and more exclusive games, which gives it an edge over the Xbox Series X in terms of gaming experience.
Overall, the PS5 is a powerful and impressive console that is definitely worth considering for any gamer. With its powerful hardware, exclusive games, intuitive user interface, and innovative controller, the PS5 offers a gaming experience that is unmatched by any other console on the market. So if you’re in the market for a new gaming console, the PS5 is definitely worth checking out.
Hey there fellow campers! Are you tired of struggling to keep your fire going throughout the night? Fear not, because I am here to share with you some fun and easy tips on how to build a fire that will last all night long!
First off, let’s talk about the materials you’ll need. You’ll want to gather plenty of dry and seasoned wood, preferably hardwoods like oak or hickory, and some kindling to get the fire started. Don’t be afraid to go big here – you can never have too much wood when it comes to building a long-lasting fire.
Next up, it’s all about building a proper fire structure. Start by laying down a base of kindling in the center of your fire pit, making sure to leave plenty of space for air to flow through. Then, stack your larger pieces of wood around the kindling in a teepee-like shape, leaving gaps between the pieces to allow for air circulation. This will help the fire get a good start and ensure that it stays burning throughout the night.
Now, it’s time to light that fire up! Rather than using a bunch of newspaper or lighter fluid, opt for natural fire-starting materials like dry leaves or pine needles. Not only are they better for the environment, but they also add to the overall ambiance of your campfire experience.
Once your fire is roaring, it’s important to keep an eye on it and make sure it stays well-fed. Add larger pieces of wood as needed, but be careful not to smother the flames. You want to keep a good balance between fuel and air flow to keep the fire burning strong.
Pro tip: If you’re planning on cooking over your fire, be sure to let it burn down to hot coals before placing your food on the grill. This will ensure even cooking and prevent any flare-ups that could lead to burnt food or worse, a dangerous situation.
Now, let’s talk about the secret to a fire that lasts all night long – the bed of coals. As your fire burns down, the logs will turn into hot embers that will radiate heat long after the flames have died down. Spread these hot coals out evenly around your fire pit and pile on more wood, being sure to leave plenty of air space between the pieces. The hot coals will ignite the new wood and keep your fire burning well into the wee hours of the morning.
So there you have it, folks – a fun and easy guide to building a fire that lasts all night long. With these tips and a little bit of practice, you’ll be the envy of your fellow campers with your roaring, long-lasting fire. So grab a marshmallow (or three) and settle in for a cozy night around the flames – you’ve earned it!
Camping is a great way to experience the outdoors, and creating content for YouTube is a great way to share that experience with others. However, combining these two activities requires some careful consideration. As an avid camper and experienced YouTuber, I’ve learned a few things about what to consider on your first camping trip as a YouTuber.
First and foremost, it’s important to plan your video content ahead of time. Think about what kind of videos you want to make, whether it’s showcasing the campsite or the surrounding area, creating a how-to video or a vlog. Knowing what kind of videos you want to make will help you plan your equipment, shooting schedule, and even your camping itinerary.
Speaking of equipment, it’s important to pack the right gear. Camping and shooting videos require a lot of equipment, so make sure you bring all the necessary gear, including your camera, tripod, microphone, and any additional lenses or accessories you need. Consider the weather conditions and terrain of the area you will be camping in and pack accordingly.
Another crucial thing to remember is to bring backup batteries and memory cards. Nothing is worse than running out of battery or storage space when you’re in the middle of shooting an amazing video. Having backups will ensure that you don’t miss any shots. Consider investing in a portable charger or solar charger for your devices to keep them charged up throughout your trip.
When it comes to filming, lighting is key. Be aware of the time of day and the direction of the light, and try to shoot during the golden hours for the best lighting. If you’re shooting during the day, consider using a diffuser or reflector to soften harsh shadows.
While you’re out in nature, it’s important to be mindful of your surroundings. Respect the natural environment and the wildlife that lives there. Don’t disturb any plants or animals, and always follow Leave No Trace principles. Be aware of the weather and potential hazards, such as steep drops or unstable terrain, when shooting.
Staying organized is crucial, especially when you’re camping. Keep your equipment organized and easily accessible, and have a designated area for charging and storing your batteries and memory cards. Consider creating a shot list to help you stay on track with your filming schedule.
Engaging with your audience is one of the benefits of creating content for YouTube. Encourage your viewers to leave comments or questions about your camping trip, and consider incorporating their feedback into future videos. Use social media to share updates and behind-the-scenes content with your followers.
Camping and the outdoors offer endless opportunities for creative video content. Think outside the box and try new things, such as time-lapse videos or aerial footage using a drone. Incorporate the natural beauty of the surroundings into your videos, and experiment with different camera angles and techniques.
Most importantly, remember to have fun! Camping and creating content for YouTube can be a challenging but rewarding experience. Take time to enjoy the surroundings and the experience, and don’t get too caught up in perfecting your videos. Sometimes the best footage comes from unexpected moments.
Combining camping and YouTube content creation can lead to a unique and rewarding experience. Consider these tips, to make sure your first camping trip as a YouTuber goes smoothly, and that you create amazing content to share with your audience.